Typedef
기존 타입을, 원하는 이름으로 정의하는 방법
#include <stdio.h>
#include <stdlib.h>

typedef long long ll;

int main(){
    ll t = 1923912912312213912; // 1923912912312213912

    printf("%lld", t);

    return 0;
}
C에서 Struct 사용법
#include <stdio.h>
#include <stdlib.h>

struct ABC{
    int a;
    int b;
};

int main(){

    struct ABC t; // C++과 다르게, struct를 붙여줘야 한다.

    // 이 방법은 C에서는 불가능
    // t = {10, 20};

    t.a = 10;
    t.b = 20;

    return 0;
}
Typedef를 활용해서 struct 사용
#include <stdio.h>
#include <stdlib.h>

// method 1 : struct 정의 후, typedef 이용
struct _ABC_{
    int a;
    int b;
};

typedef struct _ABC_ ABC;

// method 2 : 축약형으로 사용
typedef struct _DEF_{
    int a;
    int b;
} DEF;

int main(){

    ABC a = {1, 2};
    ABC b = {1, 3};
    ABC c = {5, 4};

    DEF d = {1, 2};
    DEF e = {1, 3};
    DEF f = {5, 4};

    return 0;
}
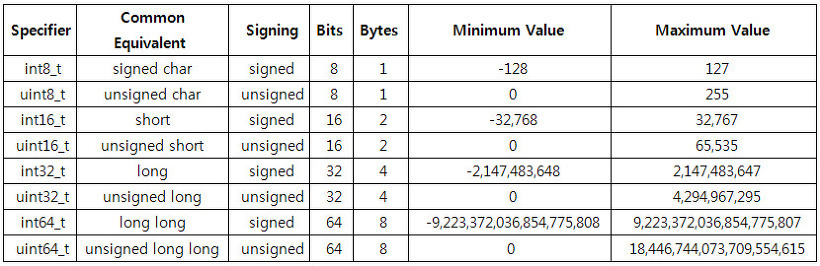
stdint.h 내부 자료형 의미
Union
여러 개의 다른 데이터 타입을 한 번에 사용할 수 있는 구조체
#include <stdio.h>

union ABC{
    int a;
    int b;
};

int main(){
    union ABC x;

    x.a = 10;
    printf("%d\\n",x.a);  // 10
    printf("%d\\n",x.b);  // 10

    x.b = 20;
    printf("%d\\n",x.a);  // 20
    printf("%d\\n",x.b);  // 20

    return 0;
}
union은 멤버끼리 값을 공유한다 → 같은 메모리를 사용한다.
사용하는 이유 - Byte 단위의 parsing을 편리하게 사용 가능
#include <stdio.h>
#include <stdint.h>

typedef union _ABC_{
    uint32_t a;
    uint8_t b[4];
} ACON;

int main(){

    ACON data;

    data.a = 0x1234ABCD;

    return 0;
}
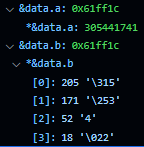
a : 305441741 → 0x1234ABCD;
b[0] : 205 → 0xCD
b[1] : 171 → 0xAB
b[2] : 52 → 0x34
b[3] : 18 → 0x12
즉, 리틀 엔디안이 적용된 메모리 값을 가져와서 볼 수 있음
중첩된 구조체 생성
// 1. Struct 내부 struct

#include <stdio.h>
#include <stdint.h>

struct Node{
    int a;
    // 구조체 내부 구조체 이름은 하단에 작성
    struct{
        int b1;
        int b2;
    }b;

    int c;
};

int main(){
    struct Node v = {0};

    v.a = 20;
    v.b.b1 = 50;
    v.b.b2 = 30;
    v.c = 10;
}
// 2. Struct 내부 union

#include <stdio.h>

typedef struct _NODE_{
    // union name을 하단에 작성
    union {
        int b1;
        int b2;
    } b;

    int c;
} Node;

int main(){
    Node t = {{5}, 7};

    return 0;
}
// 3. Union 내부 struct

#include <stdio.h>
#include <stdint.h>

union UNI{
    struct{
        uint8_t a;
        uint8_t b;
    }d1;

    uint16_t c;
};

int main(){
    union UNI t = {9, 10};

    return 0;
}

// 1. {9, 10}이 첫 번째 멤버변수 d1에 할당
// 2. d1의 a에 9가, d1의 b에 10이 할당
// 3. 따라서 메모리에 0000 1001(0x09), 0000 1010(0x0A)이 저장
// 4. Union은 메모리를 공유하므로, c도 같은 메모리에 있음
// 5. 리틀 엔디안 방식이므로, C는 0x0A09가 할당됨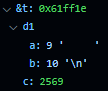
선택적 초기화 기능
C++에서는 지원하지 않는 문법
리눅스 Device Driver 개발 시 자주 사용되는 문법이다.
#include <stdio.h>

struct Person {
    char name[20];
    int age;
    double height;
};

int main() {
    // name과 height만 초기화
    struct Person person1 = { .name = "John", .height = 175.0 };

    return 0;
}
#include <stdio.h>
typedef struct _NODE_{
union {
int b1;
int b2;
} b;
int c;
} Node;
int main(){
Node t = {
.b = {
.b1 = 5
},
.c = 7
};
return 0;
}
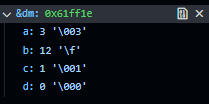
간단한 데이터 송/수신 코드
#include <stdio.h>
#include <stdlib.h>
#include <stdint.h>

int main(){

    // 보낼 데이터 (7바이트의 배열로 이루어진 데이터)
    uint8_t target[7] = { 0xAB, 0x12, 0x13, 0xFA, 0xAA, 0xFF, 0xA0 };

    // 공용체(union)를 사용하여 데이터를 다른 형태로 해석
    union _Data_{
        uint8_t receiveData[7]; // 7바이트의 원시 데이터 배열

        struct{
            uint8_t head;       // 메시지 헤더 (1바이트)
            uint8_t body[5];    // 메시지 본문 (5바이트)
            uint8_t tail;       // 메시지 꼬리 (1바이트)
        }msg;
    } dm;

    // target 배열에서 공용체로 복사하여 각 필드에 데이터 할당
    memcpy(&dm, target, 7);

    // 메시지 헤더, 본문, 꼬리 출력
    printf("Head = %02X\n", dm.msg.head);
    printf("Body = ");

    // 메시지 본문의 각 바이트를 출력
    for (int i=0; i < 5; i++){
        printf("%02X", dm.msg.body[i]);
    }
    printf("\n");
    // %02x : 비어있는 공간을 0으로 채우고 총 2자리 수로 출력
    printf("Tail = %02X\n", dm.msg.tail);

    return 0;
}
| 구조체 (Struct) 에서.. | C | C++ |
| 선택적 초기화 가능 | O | X |
| 키워드 생략 가능 | X | O |
| 선언 이후 초기화 가능 | X | O |
Padding을 사용하는 이유
Hardware 구조 상, CPU는 메모리 값을 4 Byte 단위로 읽을 수 있다.
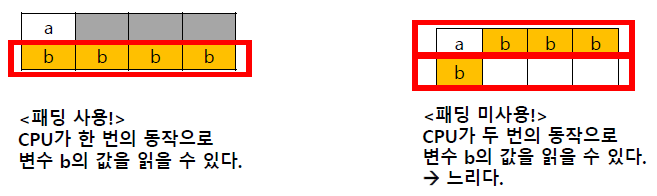
하지만, Byte&Bit Data Parsing 시에는 패딩을 제거해야 편하다.
컴파일러에게 패딩을 넣지 말라고 지시하는 명령어
• (임베디드용) ARM 의 DS 컴파일러 (ADS, Arm Developement Studio)
- 방법 1 : #pragma pack(1);
- 방법 2 : __attribute__(packed)
• (임베디드용) IAR 컴파일러
- 방법 1 : __packed struct { ... };
- 방법 2 : #pragma pack(1);
- 방법 3 : #pragma pack(push, 1) ~ #pragma pack(pop)
• MSVC 컴파일러 (Visual Studio)
- 방법 1 : #pragma pack(1)
- 방법 2 : #pragma pack(push, 1) ~ #pragma pack(pop)
• GCC
- 방법 1 : #pragma pack(1)
- 방법 2 : #pragma pack(push, 1) ~ #pragma pack(pop)
- 방법 3 : __attribute__(packed)
#include <stdio.h>

int main(){

    #pragma pack(1)  // padding 제거

    struct Node1{
        char a;
        int t;
    };

    #pragma pack(4)  // padding 원상 복구

    struct Node2{
        char a;
        int t;
    };

    printf("%d\n", sizeof(struct Node1)); // 5
    printf("%d\n", sizeof(struct Node2)); // 8

    return 0;
}
비트필드(Bitfield)
특정 Bit만 사용하는 멤버 변수를 의미
struct Node {
    uint8_t a : 3;  // 3 bit 크기, 최대 0 ~ 7 저장
    uint8_t b : 3;  // 3 bit 크기, 최대 0 ~ 7 저장
    uint8_t c : 2;  // 2 bit 크기, 최대 0 ~ 3 저장
};
예제
#include <stdio.h>
#include <stdlib.h>
#include <stdint.h>


int main(){

    #pragma pack(1)  // padding 제거

    // case 1 : 1 Byte 사용
    struct Node1 {
        uint8_t a : 2;
        uint8_t b : 5;
        uint8_t c : 1;
    };

    struct Node1 kfc1 = {1, 3, 1};

    printf("%d\n", sizeof(kfc1));  // 1

    // case 2 : 2 Byte (2+5+2 bit) 사용
    struct Node2 {
        uint8_t a : 2;
        uint8_t b : 5;
        uint8_t c : 2;
    };

    struct Node2 kfc2 = {1, 3, 1};

    printf("%d\n", sizeof(kfc2));  // 2

    // case 3
    // uint16_t : 2 byte 공간에서 3 bit 사용
    // uint8_t : 1 byte 공간에서 (2 + 5) bit 사용
    // -> 3 Byte 사용
    struct Node3 {
        uint16_t v : 3;
        uint8_t a : 2;
        uint8_t b : 5;
    };

    struct Node3 kfc3 = {1, 3, 1};

    printf("%d\n", sizeof(kfc3));  // 3

    return 0;
}
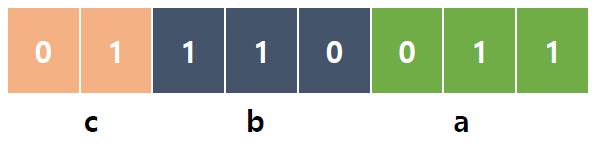
비트 지칭
[큰 bit 번호 : 작은 bit 번호] 로 지칭한다.

#include <stdio.h>
#include <stdlib.h>
#include <stdint.h>

#pragma pack(1)

int main(){

	uint8_t data = 0x73;

	struct NODE{
		uint8_t a:2;
		uint8_t b:4;
		uint8_t c:1;
		uint8_t d:1;
	}dm;

	memcpy(&dm, &data, sizeof(data));


	return 0;
}
데이터시트 (Datasheet)
부품 제조사에서 만든 세부 문서
정확히 표준화된 것이 아니라, 업체마다 다를 수 있다.
- Application Note : 데이터 시트보다 더 세부정보가 포함되어 있는 문서
- Specification : 기술에 대한 표준에 대한 상세 내용이 담겨있음
- Reference Manual : ST 의 실질적 Datasheet, 참고 메뉴얼
- Programming Manual : ST 의 Instruction Set 메뉴얼
웹 개발자는 API Document 를 보면서 개발하고
임베디드 개발자는 데이터시트를 보며 개발한다