Data Decomposition
데이터를 작은 단위로 나누어서 각각의 구성 요소를 분석하고 이해하는 기술
처리 방법
- 데이터를 단위로 분해하여 Thread Programming을 통해 처리하면 된다.

CPU Core 4개를 이용한 문자열 암호화 (Caesar cipher)
#include <stdio.h>
#include <pthread.h>
#include <unistd.h>

// thread_create 시 argument를 1개밖에 보낼 수 없으므로, 구조체 만들기
typedef struct {
    int num;
    char (*vect)[21];
} thread_data_t;

// void pointer function 선언
void *abc(void *arg){
    thread_data_t *data = (thread_data_t *)arg;

    char temp[21] = {0};

    for (int i=0; i<20; i++){
        temp[i] = data->vect[data->num][i] + 3;
    }

    printf("%d %s\n", data->num, temp);

    return 0;
}

int main(){
    char vect[4][21] = {
        "ABCDEFGHIJKLMNOPQRST",
        "HIFAKERHIFAKERHIFAKE",
        "BBQBBQBBQBBQBBQBBQBB",
        "MACMACMACMACMACMACMA",
    };

    pthread_t t[4];
    thread_data_t thread_data[4];

    for (int i=0; i<4; i++){
        thread_data[i].num = i;
        thread_data[i].vect = vect;
        pthread_create(&t[i], NULL, abc, (void *)&thread_data[i]);
        // sleep을 걸어줘서 순차적으로 print되게끔
        sleep(1);
    }

    for (int i=0; i<4; i++){
        pthread_join(t[i], NULL);
    }

    return 0;
}
# 실행 파일 생성 방법
$ gcc hi.c -pthread

Time
1. 시스템 시간 (System Time) : 컴퓨터의 현재 날짜와 시간
- 실시간 클럭 (Real-time Clock, RTC)이라고 하는 하드웨어 장치에 의해 유지
- ex) 로그 파일 기록 , 예약된 작업 수행 , 파일 수정 시간 등에 활용
*RTC : 컴퓨터가 전원이 꺼져 있을 때도 작동 - 보통 수은 건전지 사용
2. 시스템 클럭 (System Clock) : CPU의 속도를 나타내는 단위 || H/W 장치
- CPU가 클럭에 맞춰 작업을 수행 - 컴퓨터의 작업을 동기화하는 데 사용
- CPU 자체 내부 클럭도 있지만, 발열 영향 등 요소에 더 robust한 외부 클럭을 주로 사용
- ex) 타이머 구현 , 정해진 간격으로 작업 수행 , 실시간 처리 , cpu 성능 향상 등에 활용
시스템 시간과 시스템 클럭은 동기화되어 있다.
UTC(Coordinated Universal Time)
- 국제 표준 시간
- 1972 년 부터 시행
- UTC + offset 으로 시간표시
- UTC + 9 = KST (한국)
$ date
- 부팅 시 RTC 정보를 받아 linux에서 시간 정보를 관리
- Network에 연결될 때, Time 서버에서 시간을 자동 update
$ hwclock
- RTC가 갖고 있는 시간 정보 값
- Linux에서, date와 RTC가 맞지 않으면 동기화해주어야 함
# 동기화 방법

# Time server에서 시간 값 가져와 맞추기
$ sudo apt install rdate
$ sudo rdate time.bora.net  # 타임 서버에서 값 가져와 update
$ date  # 현재 시간 확인

# 1. 시스템 시간을 기준으로 RTC 시간을 변경
$ sudo hwclock -s
# 2. RTC 시간을 기준으로 시스템 시간을 변경
$ hwclock -w
RTOS
- Real time 을 위한 OS로, 정해진 타임 라인을 정확히 지키기 위해 설계됨
- 다른 OS와 다르게, System Call에 대한 Preemtive가 있다.
--> 시스템 호출에 대한 선점 기능을 제공해 높은 우선순위의 작업이 정해진 시간 내에 완료될 수 있도록
System Call : Time() -- 초 단위 시간 측정
time_t
- 시간 표현 data type
- 64 비트 unsigned 정수형 숫자
time_t time (time_t *tloc);
- 1970년 1월 1일 0시 0초부터 현재까지의 시간을 초 단위로 반환
struct tm
- c 표준 라이브러리에서 제공하는 시간과 날짜를 나타내기 위한 구조체
- localtime( time_t ) 를 이용해서 구조체에 시간 정보(int)를 담을 수 있다.
1 #include <stdio.h>
2 #include <time.h>
3
4 int main(){
5
6 time_t current_time = time(NULL);
7
8 struct tm *tmm = localtime(¤t_time);
9
10 printf("%ld\n", current_time);
11 printf("---------------------\n");
12 printf("year : %d\n", tmm->tm_year);
13 printf("month : %d\n", tmm->tm_mon);
14 printf("day : %d\n", tmm->tm_mday);
15 printf("wday : %d\n", tmm->tm_wday);
16 printf("-----------------\n");
17 printf("hour : %d\n", tmm->tm_hour);
18 printf("min : %d\n", tmm->tm_min);
19 printf("sec : %d\n", tmm->tm_sec);
20 }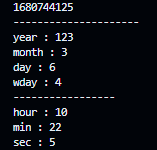
clock_t clock(void)
- clock_t type
- 현재 프로세스가 시작되고 , 얼마나 시간이 흘렀는지 CPU 클럭 수치 값
CLOCKS_PER_SEC
- 매크로
- 1 초당 시스템 clock 이 올라가는 정도를 나타낸다
  1 #include <stdio.h>
  2 #include <time.h>
  3
  4 int main(){
  5     clock_t a = clock();
  6
  7 	printf("%ld\n", CLOCKS_PER_SEC);  // 1,000,000 반환   --> 1초에 1,000,000 clock
  8     printf("%ld\n", a);  // 내 PC의 경우, 200 ~ 800 반환  --> 200 ~ 800 us
  9     return 0;
 10 }
System Call : gettimeofday -- micro 초 단위 시간 측정
int gettimeofday (struct timeval *tv, struct timezone *tz);
- <sys/ time.h > 필요
- struct timeval
- time_t tv_sec : 초
- suseconds_t tv_sec : micro 초
- struct timezone - 사용 안 함
  1 #include <stdio.h>
  2 #include <sys/time.h>
  3
  4 int main(){
  5     struct timeval time;
  6
  7     gettimeofday(&time, NULL);
  8
  9     printf("%ld\n", time.tv_sec);  // seconds
 10     printf("%ld\n", time.tv_usec); // microseconds  || 1,000,000 --> 1 sec
 11
 12     return 0;
 13 }
Watchdog Timer (WDT)
Embedded System에서, 오작동을 막기 위한 타이머
- Timer 가 끝나면 시스템 리셋 or 중지 / 메모리 덤프 / 코어 덤프 동작이 이뤄진다
- 동작 중 무한루프가 돌거나 응답이 없을 때 WDT 가 Timeout 이 된다 --> 안전장치로써 활용
평소에는 지속적으로 갱신이 필요
alarm API
특정 시간 후 SIGALRM Signal이 발생하게끔 해보자
  1 #include <stdio.h>
  2 #include <stdlib.h>
  3 #include <signal.h>
  4 #include <unistd.h>
  5
  6 void gogo(){
  7     printf("WAKE UP!\n");
  8     exit(1);
  9 }
 10
 11 int main(){
 12     signal(SIGALRM, gogo); // SIGALRM 신호가 올 시, gogo 함수 실행
 13
 14     alarm(3);  // 미갱신 시, 3초 뒤 SIGALRM 신호를 하게끔 설정
 15
 16     printf("3 seconds\n");
 17     printf("wait...\n");
 18
 19     while(1) sleep(1);
 20
 21     return 0;
 22 }
Ncurses
CLI로 GUI 같은 App 을 만들고자 할 때 사용하는 Library
# 설치 방법
$ sudo apt install libncursesw5-dev
// main.c 내용
1 #include <unistd.h>
2 #include <ncurses.h>
3
4 int main(){
5 initscr(); // ncurses 모드 초기화
6
7 printw("Hello");
8 refresh(); // 화면 갱신
9 sleep(1);
10 // clear(); <-- 화면 전체 지우기 | 디스플레이에서 좌표 초기화 등에 쓰임
11 printw(" NEXT");
12 refresh();
13 sleep(1);
14
15 printw(" TARGET\n");
16 printw(" IS\n");
17 refresh();
18 sleep(1);
19
20 printw("GOGO\nBYE");
21 refresh();
22 sleep(1);
23
24 //getch(); // 사용자로부터 키 입력 대기
25 endwin(); // ncurses 모드 종료
26 return 0;
27 }# 실행 파일 생성 방법
$ gcc ./main.c -o ./main -lncursesw
애니메이션 효과 주기
  1 #include <unistd.h>
  2 #include <ncurses.h>
  3
  4 int main(){
  5     initscr();
  6
  7     while(1){
  8         for (int y=0; y<30; y++){
  9             clear();
 10             for (int x=0; x<=y; x++){
 11                 printw("#");
 12             }
 13             printw("\n");
 14
 15             refresh();
 16             usleep(30 * 1000);
 17         }
 18
 19         for (int y=30; y>=0; y--){
 20             clear();
 21             for (int x=0; x<=y; x++){
 22                 printw("#");
 23             }
 24             printw("\n");
 25
 26             refresh();
 27             usleep(30 * 1000);
 28         }
 29     }
 30
 31     getch();
 32     endwin();
 33
 34     return 0;
 35 }
추가 메서드
move(x, y)
- (0, 0)은 좌측 상단 모서리
- x는 수직, y는 수평 이동
Random 활용
rand()
- <stdlib.h> 헤더 필요
- int형 random 값이 return
srand(seed)
- <time.h> 헤더 필요
- Seed 초기화 함수
- rand() 매번 다르게 출력할 수 있게 해 준다.
동적 모션 생성하기
눈 내리는 모션 생성
  1 #include <unistd.h>
  2 #include <ncurses.h>
  3 #include <stdlib.h>
  4 #include <time.h>
  5
  6 int main(){
  7     initscr();
  8
  9     curs_set(0);  // cursor 안보이게끔 수정
 10
 11     srand(time(NULL));  // random seed 바꾸기
 12
 13     int y = rand() % 20;
 14
 15     int step = 0;
 16
 17     while(1){
 18         clear();  // 화면 지우기
 19
 20         mvprintw(step, y,"*");  // mvprintw : move() + printw()
 21         mvprintw(step+1, y, "*");
 22         mvprintw(step+2, y, "*");
 23
 24         refresh();  // 출력
 25
 26         usleep(100000);  // 0.1초 term으로 진행
 27         step = (step+1) % 20;
 28     }
 29
 30     // getch();
 31     endwin();
 32
 33     return 0;
 34 }
Thread programming을 이용하여 display 변경하기
  1 #include <unistd.h>
  2 #include <ncurses.h>
  3 #include <pthread.h>
  4
  5 pthread_mutex_t mlock;
  6
  7 void *abc(){
  8     int num = 0;
  9     while(1){
 10         pthread_mutex_lock(&mlock);
 11         mvprintw(10, 30, "       ");
 12         mvprintw(10, 30, "%d", num);
 13         refresh();
 14         pthread_mutex_unlock(&mlock);
 15         num--;
 16     }
 17 }
 18
 19 int main(){
 20     initscr();
 21
 22     clear();
 23
 24     pthread_mutex_init(&mlock, NULL);
 25     pthread_t tid;
 26     pthread_create(&tid, NULL, abc, NULL);
 27     int num = 0;
 28
 29     while(1){
 30         pthread_mutex_lock(&mlock);
 31         mvprintw(10, 10,"        ");
 32         mvprintw(10, 10, "%d", num);
 33         pthread_mutex_unlock(&mlock);
 34         refresh();
 35         num++;
 36     }
 37
 38     pthread_join(tid, NULL);
 39
 40     getch();
 41     endwin();
 42
 43     return 0;
 44 }
$ gcc main.c -o ./main -lncursesw -lpthread
키 입력하기
한글 언어팩 설치
$ sudo apt install language-pack-ko#include <stdio.h>
#include <ncurses.h>
#include <locale.h>
int main(){
setlocale(LC_CTYPE, "ko_KR.utf8"); // 로케일 설정 (한글 출력 지원)
initscr(); // ncurses 모드 시작
keypad(stdscr, TRUE); // 키보드 입력을 처리하기 위한 설정
while(1){ // 무한 루프
int ch = getch(); // 키보드에서 문자 읽어오기
// 왼쪽 방향키 처리
if (ch == KEY_LEFT){
printw("←");
refresh(); // 화면 갱신
}
// 오른쪽 방향키 처리
if (ch == KEY_RIGHT){
printw("→");
refresh(); // 화면 갱신
}
// 위쪽 방향키 처리
if (ch == KEY_UP){
printw("↑");
refresh(); // 화면 갱신
}
// 아래쪽 방향키 처리
if (ch == KEY_DOWN){
printw("↓");
refresh(); // 화면 갱신
}
}
getch(); // 키보드 입력 대기
endwin(); // ncurses 모드 종료
return 0;
}
Thread programming을 이용한 간단한 게임 만들기
<몬스터를 피해 성배를 먹어라!>
- M은 몬스터, a는 사과, Y는 성배, ^는 가시, @는 주인공
- 게임 조건
- 몬스터를 만나면 게임 패배
- HP가 0이 되면 게임 패배
- 성배를 먹으면 게임 승리
- 사과를 먹으면 HP 1 증가
- 몬스터는 독자적으로 0.2초 간격으로 움직임 (thread programming으로 구현)
#include <stdio.h>
#include <stdlib.h>
#include <ncurses.h>
#include <locale.h>
#include <unistd.h>
#include <pthread.h>

#define N 7

pthread_mutex_t mlock;

// 게임 맵 초기화
char map[N][N+1] = {
	"#######",
	"#  M  #", // M: 몬스터
	"#^##  #", // ^: 가시
	"#    a#", // a: 사과
	"#   ###",
	"#    Y#", // Y: 성배
	"#######",
};

int prev_nx = 1;
int prev_ny = 1;

int nx = 5;
int ny = 1;

int health = 10;
int ending = 1;

void print();

// 몬스터를 움직이는 스레드 함수
void *abc(void* arg){
	char (*arr)[N+1] = (char (*)[N+1])arg;

	while(ending){
		pthread_mutex_lock(&mlock);

		int loc = 0;

		for (int j=0; j<N-1; j++){
			if (arr[1][j] == 'M'){
				arr[1][j] = ' ';
				loc = j;
				break;
			}
		}

		loc++;

		if (loc == N-1){
			loc = 1;
		}

		arr[1][loc] = 'M';

		print();

		pthread_mutex_unlock(&mlock);
		usleep(200000);
	}

	return 0;
}

// 화면에 게임 상태를 출력하는 함수
void print(){
	clear();

	int flag = 0;

	// 현재 위치에 대한 이벤트 결정
	if (map[nx][ny] == '#'){
		flag = 1;
		nx = prev_nx;
		ny = prev_ny;
	}
	else if (map[nx][ny] == '^'){
		flag = 2;
		health--;
	}
	else if (map[nx][ny] == 'M'){
		flag = 3;
	}
	else if (map[nx][ny] == 'Y'){
		flag = 4;
	}
	else if (map[nx][ny] == 'a'){
		map[nx][ny] = map[1][1];
		health++;
	}

	// 패배 시 화면
	if (health == 0 || flag == 3){
		ending = 1;
		char temp[10] = "GAME OVER";

		int step = 0;
		while (step < 10){
			mvprintw(5, step+5, "%c", temp[step]);
			usleep(400000);
			refresh();
			step++;
		}
		sleep(2);
		exit(0);
	}
	// 승리 시 화면
	else if (flag == 4){
		char temp[6] = "WIN!!";

		int step = 0;
		while (step < 6){
			mvprintw(5, step+5, "%c", temp[step]);
			usleep(400000);
			refresh();
			step++;
		}
		sleep(2);
		exit(0);
	}


	// 맵 상황 출력
	for (int i=0; i<N; i++){
		for (int j=0; j<N; j++){
			if (i == nx && j == ny){
				printw("@");
			}
			else{
				printw("%c", map[i][j]);
			}
		}
		printw("\n");
	}

	// HP 바 표시
	mvprintw(10, 0, "HP : ");
	for (int j=5; j<health+5; j++){
		mvprintw(10, j, "■");
	}
	refresh();

	// 이벤트에 따른 요소 추가 및 수정
	if (flag == 0){
		prev_nx = nx;
		prev_ny = ny;
	}
	else if (flag == 1){
		mvprintw(3, 11, "CANNOT MOVE TO THERE");
		refresh();
	}
	else if (flag == 2){
		mvprintw(3, 11, "OUCH!!");
		refresh();
	}
}


int main(){
	setlocale(LC_CTYPE, "ko_KR.utf8");
	initscr();

	curs_set(0);

	keypad(stdscr, TRUE);
	pthread_mutex_init(&mlock, NULL);

	// 몬스터를 움직이는 스레드 생성
	pthread_t tid;
    pthread_create(&tid, NULL, abc, (void *)map);

	while(1){
		pthread_mutex_lock(&mlock);
		print();
		pthread_mutex_unlock(&mlock);
		int ch = getch(); // 키 입력 받음

		// 키 입력에 따라 플레이어 이동
		if (ch == KEY_LEFT){
			ny--;
		}
		if (ch == KEY_RIGHT){
			ny++;
		}
		if (ch == KEY_UP){
			nx--;
		}
		if (ch == KEY_DOWN){
			nx++;
		}
	}

	pthread_join(tid, NULL); // 스레드 종료 대기

	getch();
	endwin();
	return 0;
}