계정 관리
Kubeflow의 multi-tenancy는 사용자 메인 페이스를 중심으로 구축되어져 있다.

User 별 namespace를 정의하고, k8s의 role-base access control policy를 사용해 user의 access를 관리하고 있다.
또한 contributor 기능을 통해 profile의 owner는 dashboard를 통해서 다른 사용자와의 작업 영역 access를 공유 및 취소할 수 있음
이를 위한 사용자 작업 요청은 Istio rbac에서 관리되고 있는 걸 확인할 수 있다.
Profile 생성
Docs의 [Components] - [Multi-Tenancy] - [Getting Started ~] 의 Manual profile creation 탭에서 다음 내용을 확인할 수 있다.
apiVersion: kubeflow.org/v1beta1
kind: Profile
metadata:
  name: namespace1   # replace with the name of profile you want, this will be user's namespace name
spec:
  owner:
    kind: User
    name: user@email.com   # replace with the email of the user
  resourceQuotaSpec:
   hard:
     cpu: "6"
     memory: "16Gi"
     requests.nvidia.com/gpu: "1"
     persistentvolumeclaims: "10"
     requests.storage: "100Gi"
Profile이 생성되면, namespace도 생성되는 걸 볼 수 있음
Profile 생성 시 기본적으로 생성되는 namespace는 metadatd의 name 이름으로 만들어지게 된다.
해당 내용으로 yaml 파일을 만들고, apply를 진행한다.
# kubeflow에 corresponding profile resource를 생성
$ kubectl apply -f profile.yaml

# Profile 확인
$ kubectl get profile -A

# namespace 삭제
$ kubectl delete namespace {삭제할 namespace}
기타 관련 명령어
# k8s pod 확인
$ kubectl get pods -A
$ watch kubectl get pods -A
$ kubectl get po -A -w

# namespace별 pod 확인
$ kubectl get po -n {namespace}

# pod 재생성
$ kubectl get pod {pod_name} -n {namespace} -o yaml | kubectl replace --force -f-

# pod 삭제
$ kubectl delete pod {pod_name} -n {namespace}

# 강제종료
$ kubectl delete pod {pod_name} -n {namespace} --grace-period 0 --force
계정 생성
계정 생성하는 방법에는 2가지 방법이 있다.
a. running state의 dex를 수정
해당 방법은 수정이 제대로 적용되지 않는 경우가 가끔 있으니, 다음 방법을 추천
b. Manifest의 config map 수정
$ vi ~/manifests/common/dex/base/config-map.yaml
빨간 박스 친 부분을 바로 아랫단에 복사/붙여넣기를 해서 파란 박스 형태로 만들면 된다
Hash 같은 경우, password를 의미하는데 원하는 비밀번호를 hash value로 변경해서 저장해주어야 한다.
본인은 다음 사이트에서 비밀번호 "1234"를 Encrypt 시킨 후, config-map에 등록했다.
Bcrypt-Generator.com - Online Bcrypt Hash Generator and Checker
Bcrypt-Generator.com is a online tool to check Bcrypt hashes. You can also use it to generate new Bcrypt hashes for your other applications that require a Bcrypt encrypted string or password
bcrypt-generator.com
이후 다음 작업을 진행한다.
# 기존 dex deployment info 제거
$ kubectl delete deployments.apps dex -n auth

# kubeflow manifest의 dex build script 참고
$ kustomize build ~/manifests/common/dex/overlays/istio | kubectl apply -f -
이후 홈페이지에서 로그인이 되는 걸 확인할 수 있다.
Contributor 등록은 좌측 탭 아래에 [Manage Contributors] 활용하면 된다.
Persistant Volume 설명
기본적으로 k8s는 container runtime을 통해 container를 다루는 container orchestration tool이다.
따라서, k8s가 재시작하게 되면, container도 재시작하게 된다.
그렇다면 발생하는 문제가 무엇일까?
노드가 예외상황으로 인해 재시작 시, 컨테이너 내부 데이터는 모두 삭제가 된다는 것이다.
그렇다면 어떻게 해야 할까?

Docker의 관점에서, 데이터를 저장하기 위해서는 volume mount하는 방법, 또는 디렉토리 or 파일을 mount하는 방법이 있다.
Kubeflow에서는 k8s가 제공하는 persistant volume을 이용해 데이터 저장 및 파이프라인 간 데이터 공유가 가능해지고 있다.
Notebook을 사용한다 가정했을 때, notebook은 persistant volume을 mount하여 사용한다.

1. PV (Persistent volume)
- admin이 Provisioning하거나 StorageClass를 사용하여 Dynamic Provisioning한 Cluster Storage
- 즉 volume 자체를 의미
2.PVC (Persistant Volume Claims)
- Pod의 Storage 요청
- 실제로 우리가 요청하는 object 형태를 의미
즉, admin이 PV를 만들어 놓으면, 유저가 PVC를 요청하여 PV를 사용할 수 있도록 만들어주는 구조
Kubeflow에서는 PVC만 만들면 admin이 PV를 만들어놓지 않아도 PV를 만들어준다. 이는 k8s의 dynamic provisioning 기능이다.
Kubeflow가 설치될 때 생성된 PV를 확인해보려면 다음 명령어를 사용하면 된다.
$ kubectl get pv -n kubeflow
Persistant Volume Claims 생성
Kubeflow에 접속해서 다음 과정을 진행한다.

좌측 [Volume] 탭을 클릭 후, [+ New Volume] 을 클릭한다.
그럼 다음과 같은 창이 뜨는데,
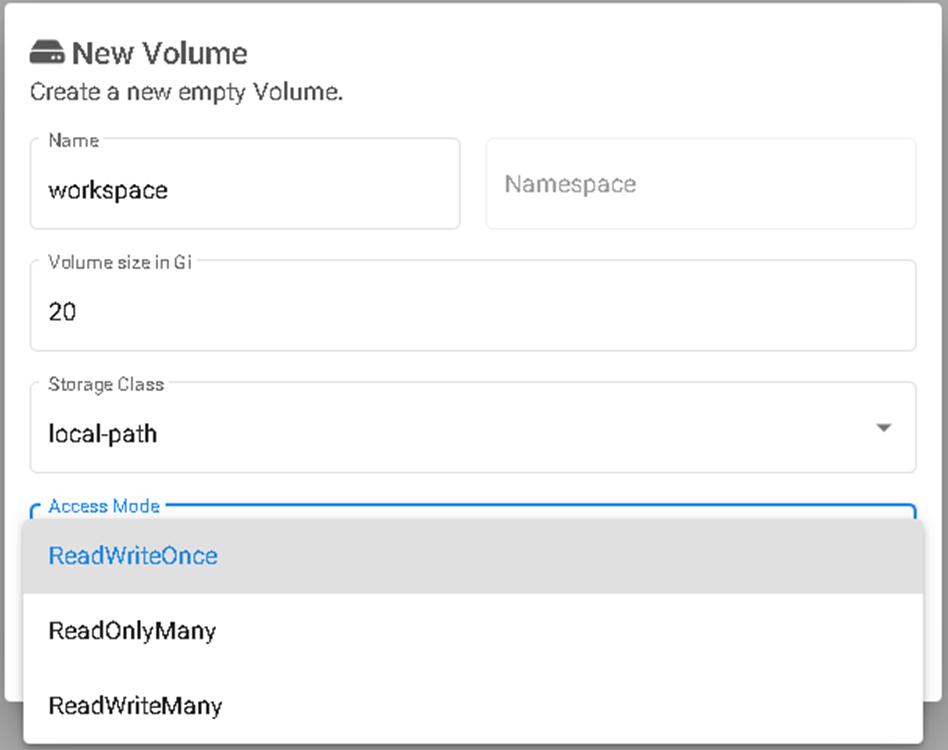
- ReadWriteOnce : 하나의 single node에서 RW가 가능
- ReadOnlyMany : 하나의 single node에서 W가 가능, 여러 node에서 R이 가능
- ReadWriteMany : 여러 node에서 RW가 가능
현재는 단일 node에서 진행 중이기 때문에, ReadWriteOnce로 진행해본다.
추가로 Volume plugin 별 지원 가능한 option이 존재하므로, 확인한 다음 사용하는 걸 추천

최초로 생성되면 pending 상태로 유지가 되고, 앞서 말했듯이 Notebook과 연결 시 bound 상태가 된다.
'IT_Study > Ops' 카테고리의 다른 글
| [MLOps] Kubeflow 내 Tensorboard 활용 방법 및 MinIO 사용 방법 (webconsole, linux shell, python code 활용) (0) | 2023.11.03 |
|---|---|
| [MLOps] Kubeflow Notebook 핸들링 방법, custom notebook 생성 (1) | 2023.11.02 |
| [MLOps] AWS EC2 Ubuntu 환경에서 Kubeflow 세팅 방법 (1) | 2023.11.01 |
| [MLOps] Docker 개념 및 흐름 간단 정리 (1) | 2023.10.31 |
| [MLOps] 코드 품질 관리(Quality Control) 관련 개념 (0) | 2023.10.30 |